Evals and Tracing 101
Tony Cueva’s plain guide for engineers, QA specialists, and PMs on testing AI systems with evaluations and tracing. It includes real code and results.
textTony (@tonycueva) · Oct 21, 2026 · x.com · Saved Oct 28, 2026
agent evaluation, evaluation design, tracing
A plain guide for engineers, QAs, and PMs who build with AI and want to learn how to test it.
Every team I talk to that builds with AI hits the same wall. The demo works. Then real users show up, and nobody can say for sure if the app gets better or worse with each change.
The skill that fixes this has a name. It is evals and tracing. A year ago it was a niche topic for a few ML teams. Today it is part of the job for anyone who ships an AI feature, whether you write the code, test it, or own the roadmap.
You can see the shift on X. In 2025, the tech leaders argued that evals matter. @GarryTan called evals "the real moat for AI startups," and @AndrewYNg called a disciplined eval process "the single biggest predictor" of how fast a team builds an AI agent. In 2026, the same idea moved into the tools and into the job. @SatyaNadella, the CEO of Microsoft, wrote that a company's traces and evals now hold its know-how, and that every company should own them. Engineers and PMs now describe evals as part of their daily work. When an idea moves from a talk into a tool, it becomes a skill that teams expect.
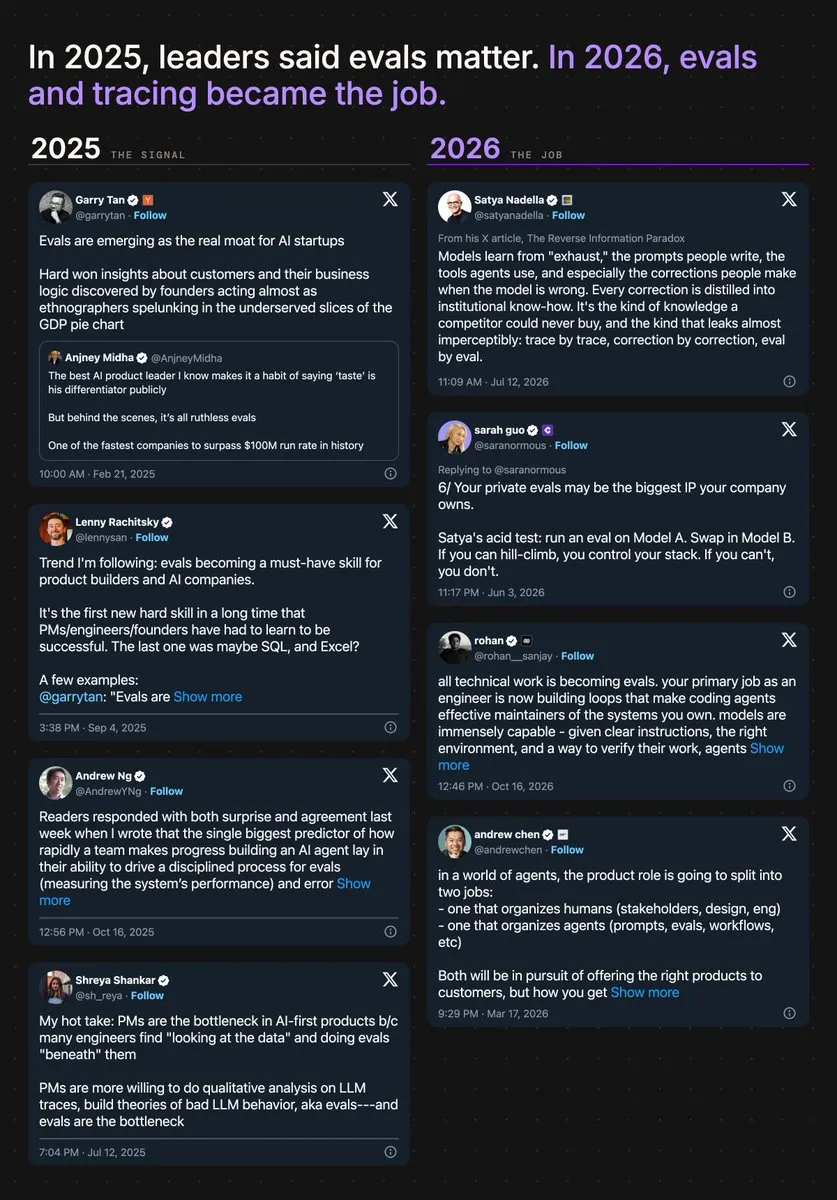
So the skill is in demand, and most people have not learned it yet. If you learn it now, you are early. This guide gives you the basics in about 10 minutes.
Why this guide matters for your role
I wrote this guide for three kinds of readers. Each of you has a different reason to learn this now.
If you are an engineer, AI changes what "done" means for your work. A feature used to be done when the tests passed. With an LLM inside, the same input can give a new answer each time, so a green test suite no longer proves that the feature works. Teams trust the engineers who can measure quality and find the exact step that broke. This guide gives you that skill in the language you already use, with code you can run today.
If you are a QA, this is the biggest change to your field in years, and it works in your favor. Exact-match tests do not work on AI output. Teams now need someone who can define a bad answer and find the edge cases that break the app. They also need someone to build a test set the whole team trusts. That is eval work, and it sits very close to what you already do. Few people have this skill yet, so the ones who learn it now stand out. This guide shows you how your current skills carry over.
If you are a PM, evals are becoming part of your job. Look at the posts above. @Lennysan calls evals the first new hard skill for PMs in a long time, and @AndrewChen expects one half of the product role to organize agents with prompts and evals. The reason is simple. You decide when an AI feature is good enough to ship, and you decide what "good" means for the customer. Evals turn that judgment into a score the whole team can see. This guide gives you the words and the method, so you can lead those decisions with confidence.
The example we will use
Picture a support bot for an online shoe store. A customer asks a question. The bot searches the help center, finds the right policy, and writes an answer. Sometimes it calls a tool to look up an order. Sometimes the chat goes on for many messages.
We will use this one bot for every example. It is small, but it has all the parts that make AI apps hard to test.
Part 1. Tracing shows you what happened
A normal app gives the same output for the same input. An AI app does not. The same question can get two different answers on two different days. So when something goes wrong, you need a record of every step the app took. That record is a trace.
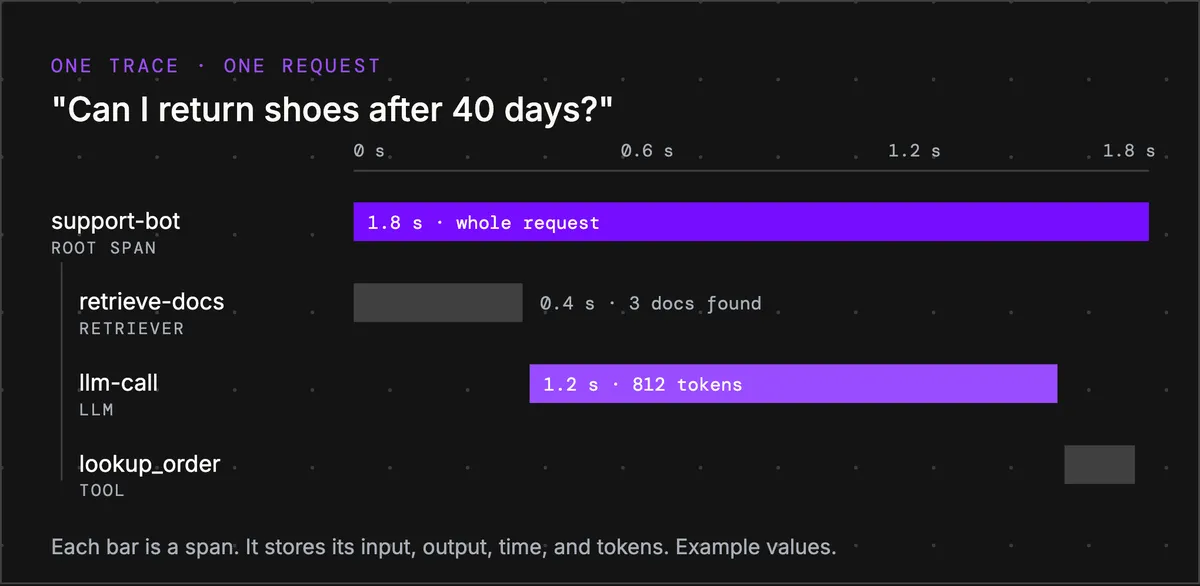
- Trace. The full record of one request, from the user's question to the final answer.
- Span. One step inside the trace. The help center search is a span. The call to the LLM is a span. The order lookup tool is a span. Each span records its input, its output, how long it took, and how many tokens it used.
- Thread. A group of traces from the same conversation. If a customer sends five messages, you get five traces in one thread.
These terms come from OpenTelemetry, often called OTel. OTel is the open standard for traces across the software industry. Most AI tracing tools build on it, so what you learn here works with any tool you pick later.
Tracing usually takes a few lines of code. With the confident-trace package, one init() call traces the common LLM libraries for you. You add a span for your own steps, and update_span records what each step saw.
What you see after you run it. Ask the bot one question. A few seconds later, the trace shows up in your tracing tool, and it looks like Image 3. You see one row for the whole request, and one row under it for each span.
Click a span to open it. The retrieve-docs span shows the question that went in and the three docs that came out. The LLM span shows the full prompt, the answer, the model, and the token count. The bar on the timeline shows how long each step took.
Now read the trace from top to bottom, one span at a time. Here is how I read the 40-day question. I open retrieve-docs first, and the return policy is there. It says 30 days. Then I open the LLM span. The answer says returns are fine within 60 days. So the search did its job. Then I read the system prompt at the top of the LLM span. An old line still says returns are accepted within 60 days. The policy changed to 30 days, and nobody updated the prompt. Three clicks tell you which part of the app to fix.
That is the habit to build. Every time the bot gives a bad answer, open its trace and find the first span where the output went wrong. Here is how each role can use that habit this week.
If you are an engineer, add tracing to one feature in staging and open the slowest trace first. Find the span that takes the most time and the span that uses the most tokens. That one trace often shows you a retry loop, or a prompt that is much longer than it needs to be.
If you are a QA, read 20 traces before you write a single test. For each bad answer, write down the span where it went wrong. Was it the retriever or the LLM call? After 20 traces you have a short list of failure types, and each type becomes a test case in Part 2.
If you are a PM, read 20 traces too, and look only at the first message in each one. That is how real users ask for help, in their own words. Compare those messages to the questions in your demo. The gap between the two tells you what the team should test first.
Part 2. Evals tell you if it was good
A trace tells you what happened. An eval tells you if it was good. "Eval" is short for evaluation. It is a test for AI output.
If you know unit tests, you already know half of this. A unit test checks that code gives the right output. An eval checks that the AI gives a good enough output. AI answers are rarely exactly right or exactly wrong, so evals use scores.
- Test case. One example to check. It holds the input (the question), the actual output (the bot's answer), and any extra data, such as the help center text the bot used.
- Metric. The rule that scores the test case, usually from 0 to 1. Answer relevancy, for example, checks if the answer addresses the question.
- Threshold. The minimum score to pass. If the threshold is 0.7 and the score is 0.6, the test fails.
- LLM-as-a-judge. A second LLM that reads the answer and gives the score. Most metrics work this way, because a string match cannot tell if an answer is helpful.
Here is a first eval with DeepEval, an open source eval framework. It looks like a normal pytest test.
Save the file as test_support_bot.py. Then run this command in your terminal.
What you see after you run it. DeepEval calls the bot, sends the answer to the judge, and prints a table in your terminal. Each row is one test case. It shows the metric, the score, the threshold, and if the test passed or failed.
The part to read is the reason. The judge writes one or two sentences on why it gave that score. For the 40-day question, answer relevancy passes with a score of 1.00. The answer talks about returns, so it is relevant. But it is still wrong, because it says 60 days.
That is the first lesson of evals. One metric checks one thing. A relevant answer can still be a wrong answer, so most apps need more than one metric.
Some rules are unique to your product. For those, you write the metric in plain English and the judge applies it. In DeepEval this is called G-Eval.
The judge sees only the fields in evaluation_params. So add the real return policy to each test case with context=[POLICY], and the judge checks the refusal against that rule. Without it, the judge can give a high score to a polite no, even when the customer can return the item.
How to read the results. You use G-Eval the same way as the first metric. Add it to the list in assert_test, and run the same command. Now each test case gets two scores, one for relevancy and one for your own rule.
When a test fails, read the reason first. Then open the trace of that answer. The reason tells you what went wrong, and the trace tells you where it went wrong. Here is how each role can use these scores this week.
If you are an engineer, put the eval file in CI next to your unit tests, and run it on every pull request that touches a prompt. Then change one word in the prompt and run it again. Watch which scores move. That shows you how fragile your prompt is.
If you are a QA, write one test case for each failure type from your 20 traces. Then run each metric on a case you know is bad. If the metric gives it a high score, fix the threshold or the criteria before you trust that metric.
If you are a PM, write the G-Eval criteria with your team, in your own words. For example, "The bot only promises a return inside the 30-day policy." Then read the judge's reason on five low scores. If you disagree with a reason, rewrite the criteria. That is how your idea of "good" becomes a number.
Part 3. Different apps need different evals
Our support bot does three kinds of work. Each kind fails in its own way, so each one gets its own metrics.
RAG apps. RAG means retrieval-augmented generation. The bot searches documents first, then writes the answer. Two things can fail. The search can find the wrong text. Or the LLM can ignore the right text and make something up, which is called a hallucination. Contextual relevancy checks the search. Faithfulness checks that the answer sticks to the text it found.
Agents. An agent picks tools and takes actions. You check two things. Did it call the right tool? And did it finish the task? Tool correctness covers the first. Task completion reads the whole trace to judge the second, which is one place where tracing and evals meet.
Multi-turn chatbots. Some problems only show up across many messages. The bot forgets the order number. It repeats itself. It drifts off topic. For these, you test the whole conversation as one test case.
What you see after you run them. You run these test cases the same way, and each metric prints its own score and reason. Look at the 40-day test case again. Answer relevancy passed in Part 2. Here, faithfulness fails with a score of 0.00. The judge's reason says the output "contradicts the context by claiming a 60-day return window".
Contextual relevancy passes, because the search found the right policy. That is the same story the trace told in Part 1. The trace showed you the bug once. Now a test catches it every time. Here is how each role can read these scores.
If you are an engineer, read the RAG scores as a pair. When contextual relevancy is high and faithfulness is low, the retriever did its job and the LLM made something up. When both are low, fix the retriever first. Each metric points to one part of the app.
If you are a QA, when tool correctness fails, open the trace. It shows if the agent picked the wrong tool, or called the right tool with the wrong input. For chatbots, write test conversations where the user changes their mind halfway. That is where multi-turn bots break most.
If you are a PM, pick the one failure that costs the business the most, for example a wrong promise about returns. Ask the team to track that metric, and check it every week. One number you check each week is worth more than a full dashboard.
Part 4. The loop that ties them together
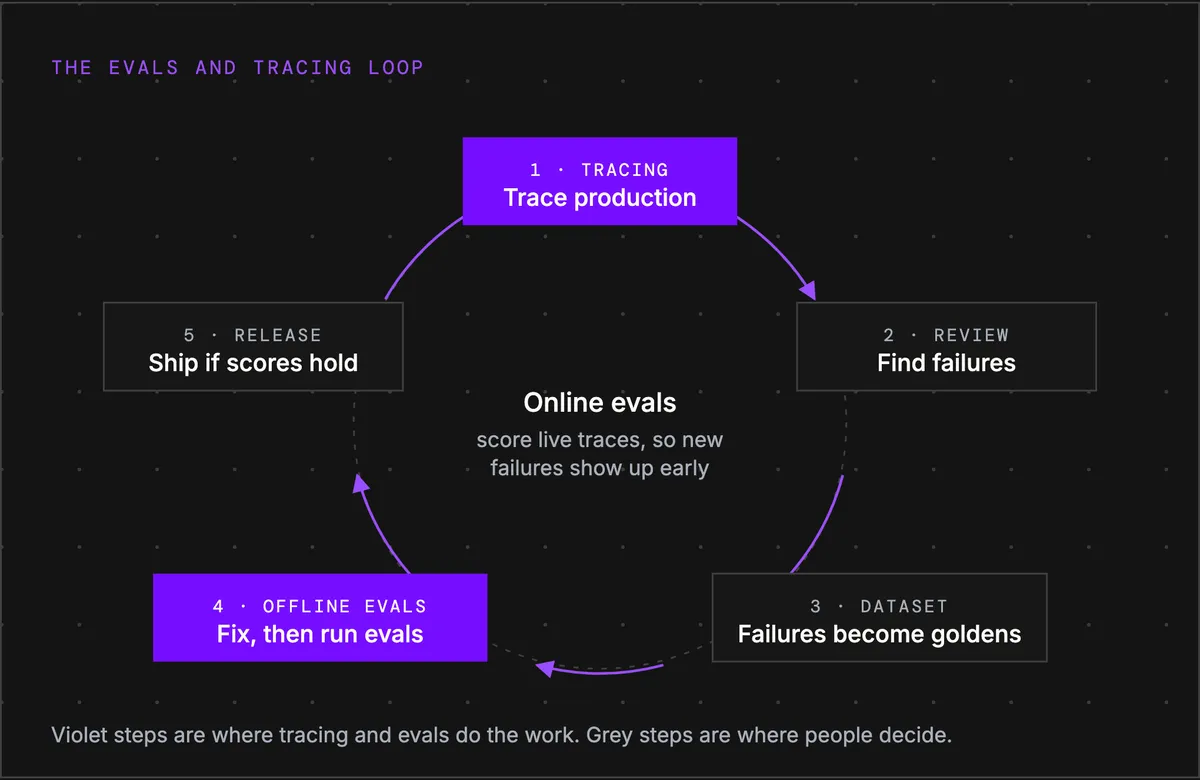
Tracing and evals are two halves of one loop. Tracing finds the problems. Evals prove that you fixed them and that nothing else broke. Two more terms help here.
- Golden. A saved example that you trust, such as a real question with the answer you expect. Goldens are your answer key.
- Dataset. Your full set of goldens. You run it every time you change a prompt, a model, or the retrieval.
- Trace production. Every real conversation becomes a trace.
- Find failures. Read traces, filter by low scores or a thumbs down, and find the bad answers.
- Turn failures into goldens. Each real failure becomes a new row in your dataset.
- Fix, then run evals. Change the prompt, the model, or the retrieval. Then run the full dataset. This is an offline eval, because it runs before release.
- Ship if scores hold. Release only when the new version passes and no old case broke. A case that passed before and fails now is called a regression.
In the middle of the loop sit online evals. They run the same metrics on live production traces, after release, so you catch new failures before your customers report them. Then the loop starts again.
What you see after you run it. evaluate() sends every golden through the bot and prints one result per golden, plus a pass rate for the whole dataset. Save that pass rate. It is your baseline.
After your next change, run the same dataset again and compare the two runs. Look at two things. Did the pass rate go up? Did any golden that passed before fail now? That second list is your regressions, and it decides if you ship. In my run, the fix took the bot from 2 of 5 passed to 4 of 5, with 0 regressions. It also repaired an answer about a late order, because the old 60-day line had leaked into it too. Here is how each role fits into the loop.
If you are an engineer, you own steps 1 and 4, plus the online evals. Start with one online metric on 10% of production traffic. Then compare its score with the offline score from the same week. A big gap means your dataset has drifted away from real traffic.
If you are a QA, you own steps 2 and 3. Each week, take the five worst traces and turn them into goldens. After a month you have 20 new goldens from real users, and your dataset becomes the one the whole team trusts.
If you are a PM, you own step 5. Before each release, ask for two numbers, the pass rate on the full dataset and the count of regressions. When the pass rate holds and the regressions are zero, you have a clear reason to ship.
Try it on your own app
You just followed one bug from a single trace to a fix you can prove. The fastest way to learn evals and tracing is to do the same with your own app this week.
Every screen in the clips above came from Confident AI. You can sign up for free and send your first trace today. Or let your coding agent do the setup for you. Pick the way that fits how you work.
Agent skills. Add the Confident AI onboarding skill to Claude Code, Codex, Cursor, or another coding agent. Then ask your agent to onboard you to Confident AI.
Wizard. Run one command. It guides your coding agent to connect your repo to Confident AI and run a first eval.
Prompt. Paste this into any coding agent from your app's folder. You install nothing first.